Body
Issue/Question
- How do I install Microsoft Visio?
Environment
- Oregon State University
- Employee
- Windows
Licensing
A license for Visio must be purchased prior to installing. Purchase instructions can be found here: Article - Microsoft Add-On License Pu... (teamdynamix.com)
Once you have purchased a license, proceed with the steps below.
Resolution
Desktop Client 365 (Windows Only)
-
Go to www.office.com and if you're not already signed in, select Sign in.
-
Sign in with the work or school account associated with this version of Visio.
Note: If you're already signed in with a Microsoft account, you'll need to sign out and then sign in with the work or school account you use with your subscription, or right-click your browser in the task bar to start an in-private or incognito browser session.
-
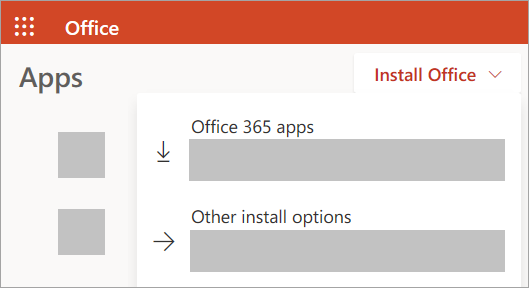
From the Office home page select Install Office > Other install options. (If you set a different start page, go to portal.microsoft.com/account#installs.)

-
From My Account, select Apps & devices.
-
Find Visio from the list and choose your language and the 64-bit or 32-bit version, then select Install Visio. (If you have any other Office apps installed, make sure to select the same bit version for your Visio installation. What version of Office am I using?)

Tip: If Visio isn't listed as an install option under My Installs, it could mean you don't have a license. Check your assigned licenses by logging in here and selecting "Subscriptions". If you don't see Visio Plan 2 listed under your assigned subscriptions, contact osu.software@oregonstate.edu for help.
*The 365 client can also be downloaded from the Software Server.
Desktop Client 2019, 2021 (Windows Only)
If installing from off campus, make sure to connect to the VPN before proceeding.
- Open Windows file explorer and enter \\software.oregonstate.edu\software into the address bar.
- If prompted for a username and password, enter "ONID\[Your ONID Username]" for the username and your ONID password for the password.
- Find the Microsoft Visio folder.
- Pick the version that corresponds with your currently installed version of Office.
NOTE: If using Office 365, you will need to use the instructions located here to make Visio work with Office 365: Article - CN - Install Visio 2019 or ... (teamdynamix.com)
- Copy the folder to your computer.
- Install either 32 or 64 bit depending on what version of office you have installed (most likely will be 32 bit).
- Run either setup.exe (2016 and below) or local_install.bat (2019) as an admin (right click->run as admin).
- Follow the steps to install Visio.
Visio Online (All Devices)
- Once the Visio online license has been assigned, you can access it here using your ONID credentials: https://www.microsoft.com/en-us/microsoft-365/visio/flowchart-software/
For assistance, contact the Service Desk.